Introduction
I thought long and hard before buying the Canon 24mm f/3.5L TS-E (T = tilt, S = shift); it’s a specialized and very expensive piece of equipment, retailing at over £1500 in the UK and $1999 in USA. As a non-pro photographer, I didn’t know whether I would get enough use or enjoyment out of the lens to justify the expenditure. However, at the time, I really wanted to get into landscape photography, which is an area where this lens excels. So after my usual month or so of constant research and lusting, I bit the bullet and dropped the spondoolies! Do I regret it? No, not at all. I have had this lens for just over a year now and it has actually seen a lot of use, has produced some of my favourite shots and has turned out to be more versatile than I thought it would.
For these reasons, I thought I would make it the subject of my first blog post, in which I will provide some information about the lens and share my experiences of it. In addition, I thought most people probably will not have come across this lens or know anything about it. I have certainly never seen anybody else using one. Hopefully I can offer some insight into the potential uses of this lens and its strengths and weaknesses. I will not go into great detail on issues like sharpness, distortion, vignetting and chromatic aberrations as, to be honest, there are very reliable sites out there that go to great effort to provide accurate information for pixel peepers (like me!); my favourites are dpreview, The-Digital-Picture and photozone. I will touch on these issues, but mostly I want to present real-life images that you can achieve with this lens. I hope that you, the readers, will find this information informative and also enjoy the photos I share. Now, step forth the Canon 24mm f/3.5L TS-E II:
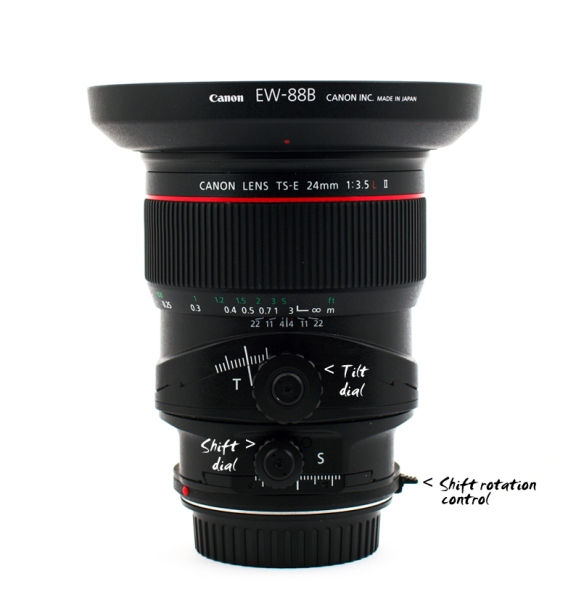
Figure 1 | Canon 24mm f/3.5L TS-E II. Dials controlling the tilt and shift movements as well as the rotation of the shift mechanism are labelled. Similar (slightly smaller) screws on the opposite side of the lens lock the shift and tilt movements to prevent slippage in use. A tilt rotation control tab and movement locking switch are also located on the other side of the lens. Click for large view.
Key lens details
- EF lens, made for 35mm full frame cameras (all samples in this blog were take with a Canon 5D mark II)
- Focal length: 24mm (obviously), with an equivalent of 38mm on APS-C cameras
- Diagonal FoV: 84 degrees (60 degrees on APS-C)
- Aperture: f/3.5 maximum, f/22 minimum with 8 rounded blades (more blades and rounder aperture opening improves bokeh)
- 16 elements in 11 groups, with 3 ultra-low dispersion (UD) glass elements to reduce chromatic aberration (colour fringing) and 1 aspherical element to correct spherical aberrations (which reduce sharpness and contrast) and correct distortion
- Size and weight: 107mm (l) x 89mm
and 780g
- Filter thread diameter: 82mm, non-rotating (important for easy use of circular polarizers and drop-in filters)
- Minimum focus distance of 21 cm, which gives a max. magnification of 0.34x
- Compatible with extension tubes (reduce minimum focusing distance and increase magnification) and extension tubes (increase focal length and also magnification)
General points
Focusing
The most importantly thing to note about the Canon 24mm f/3.5L TS-E II, is that it’s manual focus only. This makes it difficult to shoot anything moving, in fact, its hard to shoot anything really quickly with this lens. However, the main uses of a wide-angle lens of this design, landscapes and architecture, do not require autofocus or speedy use.
As you can see from the image shown in Figure 1, the focus ring is very large, and the focus mechanism is extremely smooth with a long throw. This make manual focusing easier and more accurate, though with the f/3.5 aperture and wide FoV, focusing can still be tricky. You definitely get the best out of this lens when you take your time to compose, preferably using live-view. Together with the use of a tripod, you can achieve perfect perspective control using the shift feature (see devoted section below), accurate focus, and can also tilt the lens (again, see below) to maximize your depth of field (DoF). However, none of the pictures in this post were taken on a tripod, unless otherwise stated, demonstrating that good (though generally not perfect) results are achievable when using this as a ‘walk around’ lens. This is good to know, particularly if you are planning a city break or something and are likely to take lots of architectural shots on your wanderings, but you don’t want to (or can’t) take a tripod.
Design and Build
Like the focus ring, and as expected of any Canon ‘L’ lens (I think that means luxury or something, but who knows!), the build quality and materials used in this lens are superb. They should be for the price! The construction is very solid, with everything seemingly made of metal, including the locking screws (not show in Figure 1 as they are on the opposite side) and adjustment dials for the tilt and shift mechanism. This gives the lens some weight, but it feels really nice in the hand and well balanced on the Canon 5D mark II.
One thing I find awkward with the lens design is working the tilt and shift mechanism with my face to the camera. Although the locking nuts are smaller, I frequently confuse them with the tilt/shift adjustment dials, as well as confusing the medium-sized shift dial and the tilt adjustment. I also find it fiddly to access some of the dials with the lens in certain positions. However, with the camera on a tripod (the way this lens should really be used) this is not a problem, and I don’t really see how it could have been designed any better. It is just a minor niggle that will probably resolve itself as I become more familiar with the lens.
I don’t feel that anything is going to break on this lens. However, I recently read a review written from the perspective of a lens rental company and they have experienced ceasing or breaking of the nuts/dials controlling the lens movements under heavy usage or after storing/transporting the lens with the movements locked. They mention that this is expensive to fix, but can be prevented by storing the lens without the locking switch and locking screws engaged. The screws seem sturdy to me, but I try not to force them or do them too tight now, and I do not use the locking switch.
One thing I do worry about with this lens is getting caught in the rain. I have used it a could of times in showers or in proximity to splash from waves or waterfalls and I about had a heart attack each time! The movement of the lens makes it near impossible to weather seal and great care must be taken to prevent dust or moisture from entering the lens.
The lens is also supplied with its own special lens hood, which is very slim and wide. This means it offer little protection of the front element from damage (one reason why I always try to use a hood), and I am not sure how much it prevents flare. But it must do something, right? I have not formally tested it, but I use it anyway; it can’t do any harm. I have heard mention of people (including Canon I think) recommending carrying something extra, like a sheet of card, to shield the lens more if flare is likely. I don’t bother, but as you will see later, maybe I should!
Speed
The ‘E’ in TS-E stands for electronic aperture, so there is no manual aperture ring on the lens and the aperture value is set in camera. This allows metering and focusing wide open, with the camera stopping down the lens as the shutter is pressed.
The lens is not particularly fast, with a maximum aperture of f/3.5, but is not far off the ‘fast’ f/2.8 zoom lenses that cover 24mm (canon and non-canon 16-35mm and 24-70mm) and is a little faster than the Canon 24-105mm f/4L IS USM. However, the latter and now the Tamron 24-70mm have image stabilization, reducing the effects of camera shake (but not subject movement) and enabling hand-holding at slower shutter speeds. Of course, all the zooms benefit from increase versatility and autofocus. These lenses really serve very different purposes though (although I chose the 24mm TS-E over the 16-35mm for landscape use), and have their own strengths and weaknesses. Really, the tilt-shift should be considered as primarily a landscape/architectural lens, where a tripod allows the use of a long exposure if needed or wanted. That being said, with the low light performance of current DSLRs, the wide focal length (making it easier to hold steady) and the ability to tilt to maximize use of the focal plane (again, see ’tilt’ below), I do not find the f/3.5 aperture limiting on this lens.
If you want a fast prime for subject isolation and bokeh, the Canon EF 24mm f/1.4L USM II is the obvious choice that this focal length. However, the tilt-shift is still an option as you can move the focal plane around to produce narrow depth of field (DoF) and selective focus effects, as I will show/discuss below. The effect achieved is a little different, but it provides creative opportunities and variety.
Compatibility with filters
The Canon 24mm TS-E has a 82mm filter thread that does not rotate during focusing, which, combined with a front element which does not protrude from beyond the lens barrel, enables the use of screw on filters and holders for drop-in type filters. This is important for a lens that is mainly intended for landscape, architectural and, potentially, product photography.
I use a screw on UV filter to protect the front element, the sensor and reduce haze. I also use a screw on circular polarizer sometimes, to reduce reflections, boost colours and rescue some detail from bright skies. Most of the photos in this post were taken using a polarizer. I also use the Hitech drop-in filter system from Formatt, which I will do a review on sometime in the future. As seen in Figure 2 below, the filter holder screws on to the front of the lens and you slide the square filters into this, in front of the lens. Accurate placement of the drop-in filters and adjusting the rotation of the circular polarizer would be much more difficult and laborious if the filter thread rotated during focusing; luckily, this is not a problem with this lens.

Figure 2 | Canon 24mm f/3.5L TS-E II mounted on Canon 5D mark II with Hitech filters attached. The lens is shifted down to correct perspective (by preventing the camera from being angled down) and tilted slightly to maximize use of DoF.
Minimum focusing distance (MFD)
During my day in London taking images for this post, I noticed that the minimum focusing distance (the closest you can get to the subject and focus on it) is tiny! The official measurement is around 21cm, but I think this is measured from the sensor, or the rear element or something. The actual distance from the front element to the subject is more like 5cm or less (Figure 3, middle). In the image on the left of Figure 3, the flower petals were touching the front element!

Figure 3 | Minimum focusing distance. Left and right images are taken at MFD, giving some idea of maximum magnification possible. The middle image shows how close you have to get! Click for larger view.
This short MFD gives a great magnification ratio for a wide-angle lens of around 0.34x, which can allow one get near macro images. One can fill a good proportion of the sensor with a subject whilst also capturing more of the background than a more traditional macro lens with a focal length of 100mm or 180mm, putting the subject into context. Imagine the the shot on the left in Figure 4, below, taken with a 100mm lens, the narrow FoV and resulting compression effect would reduce the number of flowers than could be seen behind the subject, making it less dramatic, and would render more of the background as bokeh (which could be desirable or not). I wish had a macro lens at the time so I could demonstrate this, but you can get an idea from the focal length comparison in the ‘Distortion‘ section below (Figure 13).

Figure 4 | Introduction to the effect of tilting the lens. Obviously the framing of these images is not exactly the same. However, hopefully they show the colours and detail that can be achieve and how tilting the lens, probably around 7 degrees to the left in this case, changes the plane of focus. Click for larger view.
Add the ability to tilt the plane of focus (see ’tilt’ section below) to get more of your subject in (or out) of focus, and one can be increasingly creative. The shot on the right side of Figure 4 introduces the tilt feature, and hopefully you can see how this allows you to angle the focal plane to get more of, or a specific area of, your subject in focus without closing down the aperture. This can be useful in macro/product photography, where you need usually need large DoF to get the close-up subject in focus, as it makes it possible to use apertures that allow a faster shutter speed/lower iso setting or that are below the limits of diffraction, which introduces softness. In this case, at f/3.5 I was able to get many, many more flowers in focus, although this is not the best example of what I mean (for a better example check out this site).
Using extension tubes or extenders, the maximum magnification possible with this lens can be increased to nearer 1x. However, using this lens at MFD, particularly with extension tubes (which reduce MFD even further), raises the problem of getting too close to your subject to get enough light into the lens, or simply scaring the subject away, if alive.
Bokeh
Being a 24mm f/3.5 lens, the TS-E would not be expected to throw much of the scene out of focus to produce bokeh. However, as mention above, using the tilt feature or the short MFD, it is possible to get quite a lot of bokeh. In fact, using the TS-E’s tilt function can result in extremely narrow DoF, and I often stop down quite a bit to get enough of the scene in focus.
The lens has 8 circular aperture blades and actually produces quite nice blur; not stunning, but it is smooth and unobtrusive. Out-of-focus highlights are usually rendered as circles with little fringing (I have never noticed any), even when stopping down a fair bit. I am sure the Canon EF 24mm f/1.4L USM II, with its large aperture can produce more blur with a nicer character, but that is a whole different lens generally used for different purposes. Hopefully, the images of the flowers above give some idea of the blur possible and its character. You can get more of an idea of what the bokeh is like from the images in sections below (Figures 6, 7 and 13).
Special abilities
The 24mm TS-E is a tilt and shift lens. Tilt and shift refer to movements of the lens barrel, which allow you to adjust the plane of focus and the perspective, respectively. For this reason, the lens is lusted over by landscape and architectural photographers. Below I will explain in more detail what each of these movements does and post examples of their use. The movements on this lens, unlike on the mark I version, are fully independent, meaning one can rotate their directions relative to each other to produce any combination wanted. Figure 5 shows a Photoshop composite which demonstrates the movement of the tilt and shift modules.
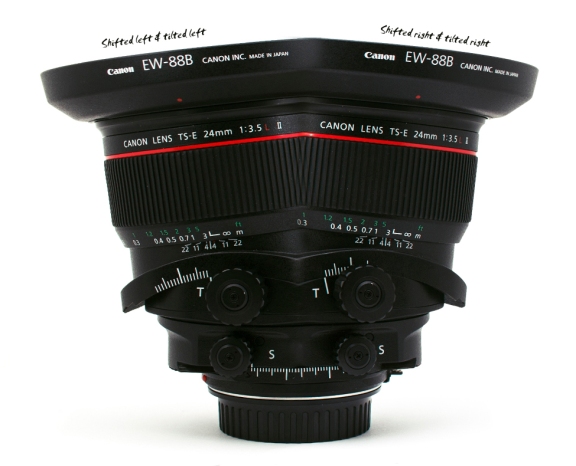
Figure 5 | Composite image showing the lens movements. Note how the lens would shift left/right or up/down at the base, depending on the rotation of the lens relative to the camera body. The same is true for the upper tilt mechanism. Tilt and shift movements are fully independent of each other, so the combination of movements available is near infinite. This image is a Photoshop freak show, and should not be considered 100% accurate!
Tilt
The lens can be tilted up to 8.5 degrees left, right, up or down, depending on the rotation of the barrel relative to the mount. Markings are provided on the lens at 1 degree intervals. Basically, the angle of focal plane can be adjusted from parallel with the sensor to almost 90 degrees perpendicular to it, either in a horizontal or a vertical direction. In addition, the barrel can be twisted to a hard stop at the 45 degree position left or right, giving a focal plane that cuts across the sensor at an angle. Any angle of rotation can be used, really, but the lens only offers click stops (where the barrel is locked in place) at 0, 45 and 90 degrees. Using a different angle is tricky as the rotation is not held, and I have only every used the click stop positions, mainly at 0 and 90 degrees. Being able to adjust the angle, placement and depth of the focal plane offers almost endless creative possibilities. Basically I see two main uses for this function of the lens: 1. Selective focus and miniature faking, in which the DoF is restricted; and 2. expanding the available (or maximizing use of) DoF.
Selective focusing and miniature faking:
Generally, when going for selective focus (Figure 6) and miniature effects (Figure 7) I whack the tilt to 8.5 degrees to maximize the out-of-focus effect. As mention previously, this creates a very narrow wedge of in focus area, particularly wide-open or at large apertures. Using this effect can be fun, but it can be overdone, and you can create similar effects in Photoshop. Therefore, I wouldn’t recommend buying the lens solely for the purpose of creating fake miniature scenes. I have seen really cool ones though, particularly when users coupled the tilt effect to DLSR video recording/timelapse. Indeed, the excellent focus ring on this lens makes it very amenable to use in video.
- Selective focus examples:
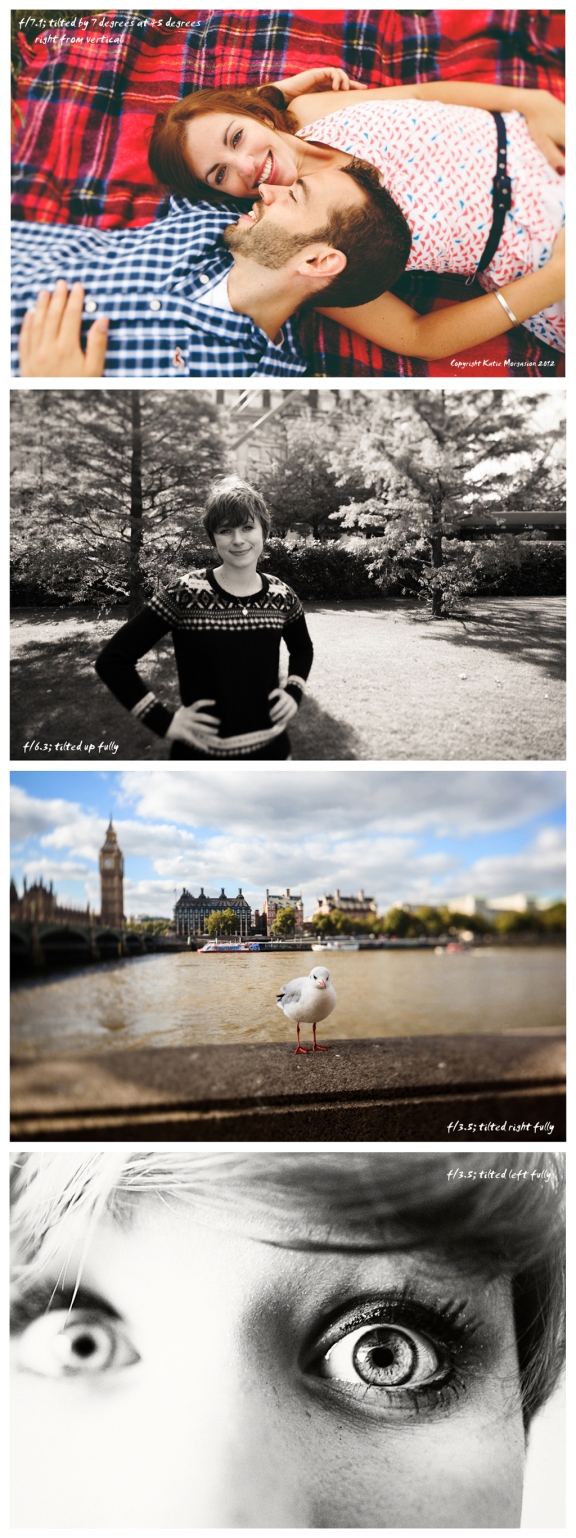
Figure 6 | Selective focus examples. This effect can be used to isolate your subject in a dreamy way that is different from the usual shallow DoF rendering produced by fast lenses. Note that, due to rotation of the tilt mechanism, the focal plane is at around 45 degrees to the sensor in the top image, 90 degrees horizontal in the middle image and 90 degrees vertical in the final two images.
I have mainly used selective focusing at weddings, to focus attention on faces and blur bodies/backgrounds (as in the first examples above), and to focus on the bride and groom down the isle of the church. In the image of the couple above, a standard lens would have rendered most of their bodies in focus with limited out-of-focus blur beyond them (even using a very fast lens, because of the wide FoV). Using the tilt function, only their faces are in focus, whereas everything else is blurred.
For this effect, a longer TS-E lens, like the Canon 45mm f/2.8 or 90mm f/2.8 (or the Nikon 45mm and 85mm PC-E lenses), would reduced intrusion on the subject by placing them further away. They might also produce nicer effects, with more blur and compression, and less wide-angle distortion. However, for first example above, the wide-angle FoV helped as we were standing over the couple shooting down, thus limiting the distance we could get from them.
- Miniature fakes:
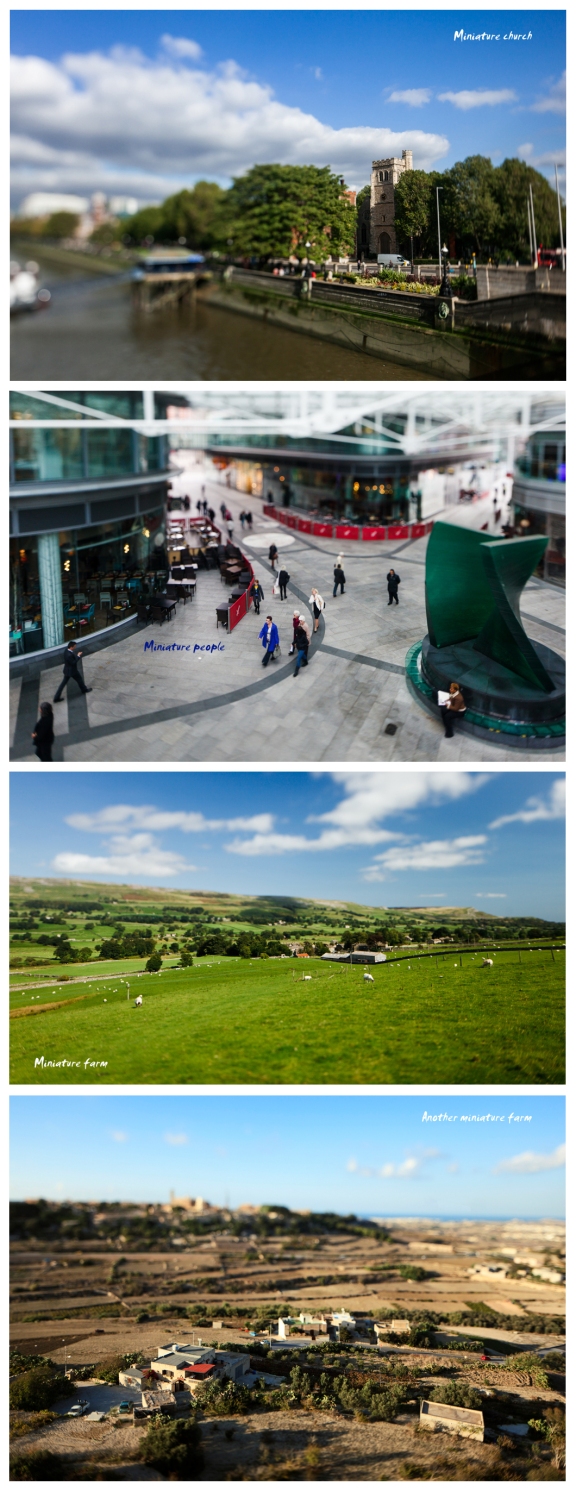
Figure 7 | Miniature fakes. These are variations on the selective focus effect caused by using the shallow DoF at a greater distances, which is only really possible with a tilting lens (or using computer programs). The ‘macro’ appearance of a scene that would not be expected to look that way tricks your brain into thinking miniature.
I find that the key to getting the toy model effect is to get above your subject and look down, use very narrow DoF and boost contrast and saturation. Generally, I prefer to tilt the plane up or down for this effect, creating a horizontal in focus area that, for me, works better. I personally love the effect, but try to use it selectively.
Maximizing DoF
More subtle movements, as shown Figure 2 (which resulted in the black and white image in Figure 8), can be used to create an ‘angled wedge’ of DoF that encompasses more of your subject at larger apertures than the usual parallel area of DoF produced by standard lenses would cover. One is not really increasing the DoF, just using it more effectively. As explained above, this allows the use large apertures, letting in more light and reducing the impact of diffraction. That might have boggled your mind, and I still struggle to use tilt for this purpose, so if you would like to learn more there is a good explanation here. A fair amount of time, experimentation, a tripod and live-view are needed to get this right. Nevertheless, for product and landscape photography, the resultant increase in image quality is worth it, as you will get super sharp, detailed images.
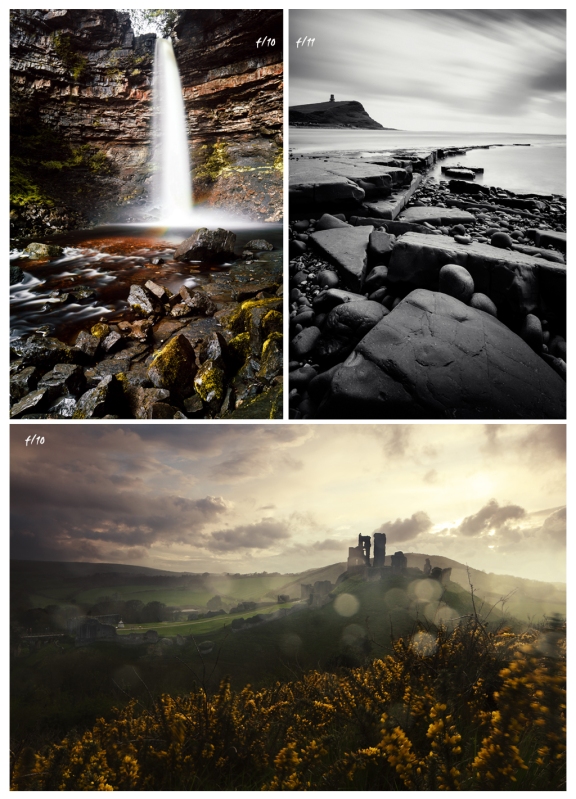
Figure 8 | All in focus. In these images, the aperture was kept close to the maximal performing value for the lens and at values unaffected by diffraction. The lens was slightly tilted (probably by less than a degree or two) to ensure the whole scene was sharp, from foreground to background/horizon. The shots were taken with the aid of a tripod.
Shift
Perspective correction
Of the functions that the TS-E lens offers over other lenses, I think I use the shift effect most. The shift mechanisms allows movement of the barrel of the lens 12mm up or down. Like the tilt dial, markings are provided on the shift mechanism, this time at 1mm intervals. Once again, the direction of shift can be freely rotated, with locking possible at 30 degree intervals. This enables the lens to be moved in multiple directions, whatever the orientation of the camera: up and down, left and right, or diagonally.
So why is this useful? Well, when a camera is angled up or down, the perspective of the scene is altered, and converging or diverging verticals are introduced. Structures, like street lamps, buildings, cliffs or mountains, appear to fall backwards and point inwards towards each other as they rise when viewed through a lens that is angled upward. Conversely, looking down, from a skyscraper on to a city for example, makes vertical structures look like they are spiking out away from each other. Your eye and brain are good at correcting for this to some extent, giving you an idea of what the scene should look like. However, your camera lens and sensor are not. These effects are generally more obvious with a wide-angle lens, as usually one is closer to the subject necessitating tilting of the camera up or down to frame correctly.
How does shifting the lens help? Simple put, shifting the lens up or down corrects for this effect by moving the lens barrel relative to the camera body, projecting a scene viewed from a corrected perspective on to the sensor. It is basically like changing your eye-line to look directly at a subject without angling your vision up or down. Thus, angling of the camera is likewise avoided, and verticals remain straight. This might be difficult to envisage, so take a look at the examples in Figures 9 and 10 where you can see the results of shifting and, hopefully, get a better understanding of what I have described.
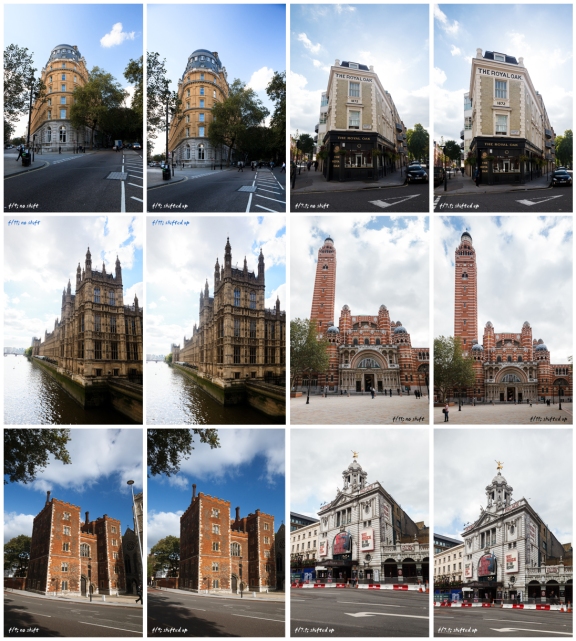
Figure 9 | Perspective correction examples. Shifting the lens barrel up projects an image from a more natural perspective allowing the camera to be kept straight, preventing converting/falling verticals. Click for larger image.
All the examples in Figure 9 required the lens to be shifted up. I find this the most common movement needed. However, I have to shift down sometimes to include foreground interest in landscape shots when I cannot get my tripod low enough (so would usually have to angle the camera down). In addition, as seen in the following shots (Figure 10) sometimes down-shift is needed if you are above the subject.
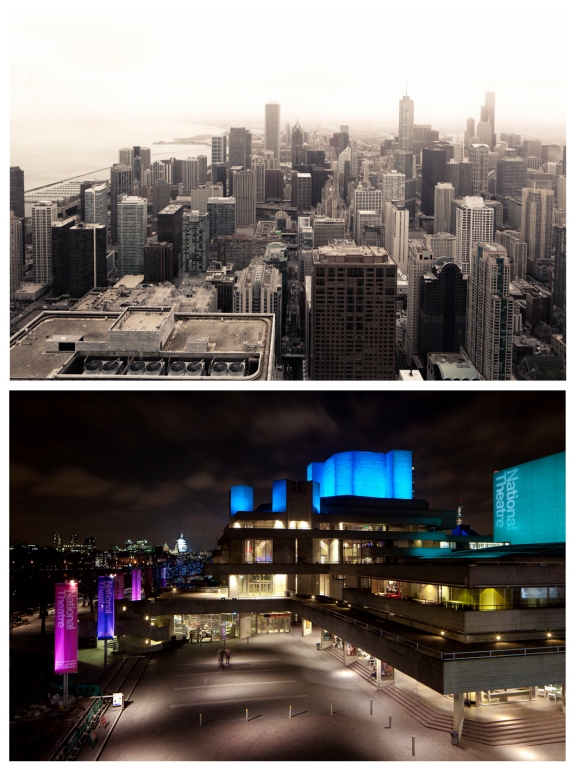
Figure 10 | Shifting down to correct perspective. Uncorrected examples are not available, but note how the verticals are straight despite my perspective from above the subjects. The lower image was taken from a tripod.
Hopefully now you can see why the lens is so coveted by architectural and landscape photographers. You can, of course, use digital manipulation of images taken with standard lenses to correct perspective. However, doing so will resulting in cropping of the image and a significant reduction in image quality, as shown clearly here.
Remember you can also shift left and right or diagonally, thus allowing correction of perspective when you cannot directly align the camera on the same angle as a subject. This is, I suppose, akin to shifting your head to look at something from a slightly more direct (or just different) angle. In the extreme, imagine looking round the edge of a wall you cannot get around for a view of what is beyond; a shiftable lens can allow you to do this.
Panoramas
So what else does shifting the lens allow? How about the creation of high-resolution images through seamless panorama stitching. By shifting the lens in multiple directions with the camera in the same position, you get overlapping images that can easily be merged using software like Photoshop. Ideally, the lens would be kept in the same position and the sensor would be shifted by moving the camera at the mount, as this would prevent the change of perspective introduced by moving the lens, thus giving no parallax distortion; however, the lens doesn’t have a tripod mount. No matter, the results achieve with shifting of the lens are great. I produced a very quick panorama, with the shots taken hand-held, to demonstrate this ability. Better results would be possible by using a sturdy tripod. Theoretically, a FoV equivalent to that of a 17mm lens and an image resolution of around 35 megapixels is possible by combining 2 images in this way. Furthermore, shifting the lens in more directions to cover a larger area (though more square shaped) is possible, and would give a very high resolution final image.
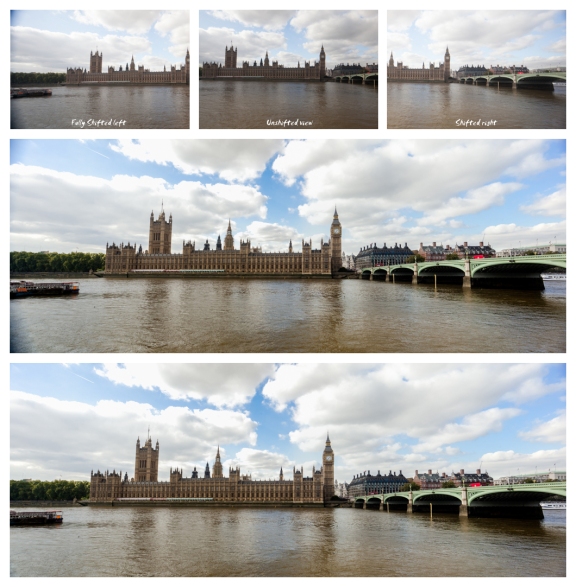
Figure 11 | Using shift to create panoramas. 3 images were taken, though only the left and right shifted images were needed as they overlap. The unshifted image shows the normal 24mm FoV. Shifting the lens introduces light fall off (vignetting) and mechanical vignetting, which is particular visible on the left-hand side. The latter has been cropped out in the final image. You can also see exposure differences introduced by shifting (slight over exposure).
The images in Figure 11 demonstrate an issue caused by shifting, namely, vignetting. In this example, the presence of UV and circular polarizing filters on the lens has exacerbate the problem by causing mechanical vignetting, which is difficult to correct without cropping. I comment further on vignetting in a later section.
How is shifting possible?
Obviously, the lens barrel just moves, right? Well, yes and no. The same function in a lens not designed to do this would not give the same results. The image circle produced by most lenses design for 35mm full frame or APS-C cameras is just large enough to cover the sensor and, thus, does not project an image large enough to move the lens in this way and still place light on the sensor. So shifting would essential result in massive mechanical vignetting (a similar effect is seen on the left of the panorama in Figure 11). However, the glass in the TS-E is designed to project a much larger image circle (close to medium format coverage). Therefore, when shifted, light from a different region of the lens is still projected onto the sensor, explaining how perspective control is possible. The complex design of this lens, which enable it to move in multiple ways and throw a large image circle (requiring larger glass elements) is what justifies (to some extent) its high price.
Performance
Metering
Usually I wouldn’t feel it was necessary to include a section on metering in a lens review. Generally, lenses allow pretty accurate metering. However, this is not always the case with tilt-shift lenses. Cameras meter and set exposure by measuring light coming through the lens, which is scattered off the focusing screen. When part of the barrel of the lens is moved the scatter of the light is altered, which can confuse the cameras sensors and result in metering errors. I notice this most when the lens is fully shifted or tilted, and it is definitely something to bear in mind. If possible, meter with live-view or before moving the lens, constantly check the review image and histogram, and shoot in RAW to allow some correction of incorrect exposure.
Sharpness
The sites I refered to earlier (dpreview and photozone) analyse sharpness better than I ever could, so what can I say about it. Well, this has to be one of the sharpest lenses I own and I have some sharp lenses including the Canon 35mm f/1.4L, the Sigma 85mm f/1.4 and the Canon 135mm f/2L. I think the 135mm runs the 24mm TS-E close for the honour of being the sharpest lens I own, and that lens is renowned for its sharpness. Suffice to say, this lens is sharp at all apertures when not tilted or shifted, which is probably a benefit derived from its huge image circle. The TS-E II apparently performs much better in a number of respects compared to the TS-E I, and sharpness is one.
The 24mm TS-E II is, of course, affected by diffraction above around f/11 and at f/3.5 you might notice a little more softness in the edges of the frame compared to the centre. However, unless you are printing huge or viewing all your pictures at 100%, then you will not notice this. Generally, I look at the pictures coming from this lens and, after a bit of editing to improve fine details and contrast, they look razor sharp with stunning details. That’s all I can say. Hopefully, the 100% crops in Figures 12 and 14 will give you some idea of the sharpness.
Something that might reduce sharpness is shifting and tilting. Shifting in particular has a bigger affect, and the more you shift the greater the decline in image quality. In this situation the sensor is gathering light from the edges of the image circle. The image quality of virtually all lenses deteriorates at the edges of the frame. However, on most occasions the lens is used at smaller apertures when shifted, which improves sharpness as it does for a non-shifted lens. Really, sharpness is not an issue with this lens, in fact it is a positive feature.
Another thing that I have noticed that reduces perceived sharpness is a small amount of chromatic aberration (see dedicated section below) that this lens has. This also seems to give the images a slightly grainy/pixelated quality in some regions when viewing at 100%, but is easily fixable in Canon’s DPP software or in Lightroom, as shown in Figures 12 and 14.
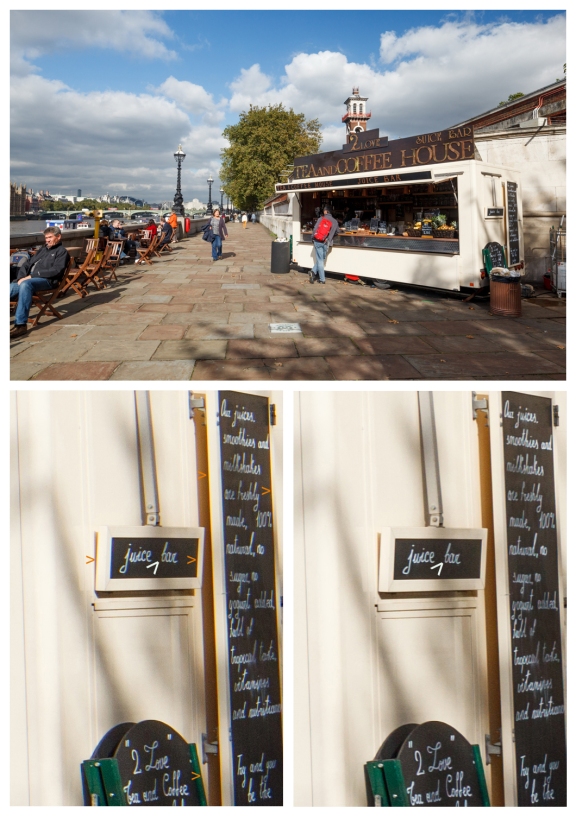
Figure 12 | Like a razor. 100% crops of the image are provided, with (left) and without (right) chromatic aberration (CA) correction applied. I feel that the slight CAs (orange arrowheads) can give the images a pixelly look that reduces perceived sharpness (see white arrowhead). This is easily corrected using lens profiles in Lightroom or DPP. The image has a little more grain/noise than usual as I pushed the shadows slightly to bring out more detail in the cabin. Shot at iso400, f/9, 1/320 sec. Click for larger.
Colours
The colours from this lens are superb, as you would expect from any L lens. Vibrant, rich, saturated and slightly warm. Really nice. Add a circular polarizer and the results can be stunning. No complaints here.
Contrast
The Canon 24mm f/3.5L TS-E II retains good contrast, but is not the best performer in this respect. My Canon 135mm f/2L, Sigma 85mm f/1.4 and, maybe, my Canon 35mm f/1.4L are clearly more contrasty. In Lightroom, I typically increase the contrast slider to 10-20 with these lenses, but up to 30-40 with the 24mm TS-E (particularly if the sun is near the edge of the frame producing some flare). Though not a huge problem, contrast is an area that I feel could be improved upon.
Distortion
The lens has no obvious barrel or pin-cushion distortion. It is clear that Canon had architectural photography in mind when designing this lens, as they should have done. Fantastic performance in this respect for a wide-angle lens.
The wide-angle effect
This is not strictly ‘distortion’, more a result of the wide-angle FoV, however, I thought I would mention it for those not familiar with the effect; placing a subject, particular people, close to the lens (especially in the corners) will give them an odd appearance. Notably, legs are elongated or made to look chubby depending on the perspective, and noses and chins are accentuated. This is demonstrated in Figure 13.
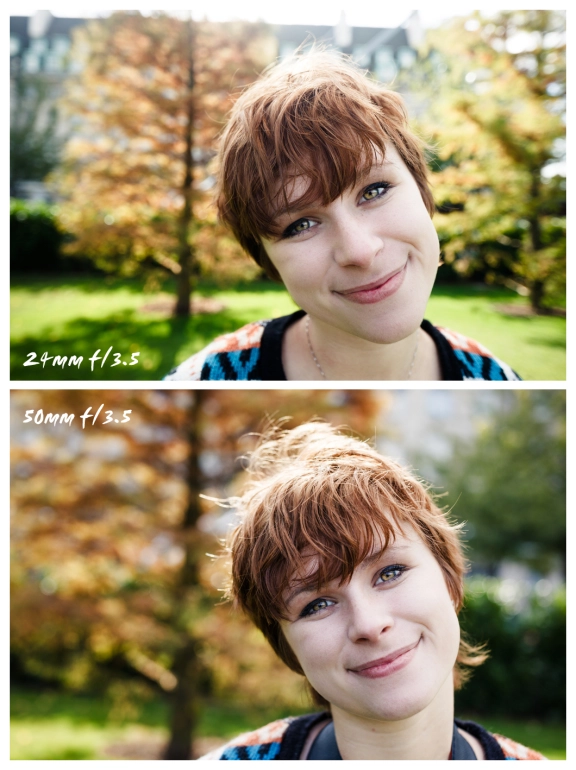
Figure 13 | Hey big nose! Wide-angle lenses can alter the appearance of people in an unflattering way. However, they can put the subject into context by including more background, but this produces less bokeh. The bokeh and colours produced by the Canon 24mm f/3.5L TS-E are superb! The lower image was shot with a Sigma 50mm f/1.4 at a distance that gave similar framing to the 24mm. Click for larger view.
Kate, my girlfriend, usually has a lovely face, but in the top image of Figure 13 it looks kind of long and angular. The wide-angle effect is clear from the comparison with a Sigma 50mm lens. Therefore, bear your subject placement in mind with any wide-angle lens. Nevertheless, I do use this lens for group shots and fully body portraits with the subject a reasonable distance from me and towards the centre, and it performs superbly.
The shots in Figure 13 we taken at the same aperture and you can see the differences in FoV, compression and bokeh I mentioned earlier. Whilst, the 24mm f/3.5L has less out-of-focus area than the 50mm with similar framing of the subject, the bokeh is pleasing, though maybe not quite smooth as the Sigma (bear in mind the Sigma 50mm is generally accepted to produce beautiful blur).
Vignetting
Vignetting is not a problem with the lens in its standard position. There is almost no observable light fall off, even wide-open. Introduce shift and vignetting increases the more the lens is moved, though only on one side of the image (as the other will be towards the centre of the image circle). Vignetting can become and issue at maximum shift, but is correctable (unless filters cause mechanical vignetting). If you are lucky, the vignetting might even be in a position that reduces the exposure of skies which would otherwise be overexposed.
Chromatic aberrations
As mentioned in the ‘Sharpness‘ section, there are some CAs with this lens in high contrast regions. This is usually not intrusive or extensive, and is of a blue/orange character which is much less ugly that the usual green/purple type that plagues fast lenses. As shown above in Figure 12 and Figure 14 below, the CAs are also easily fixable. You might not notice them anyway in normal images, like the one below, unless you zoom in to 100%.
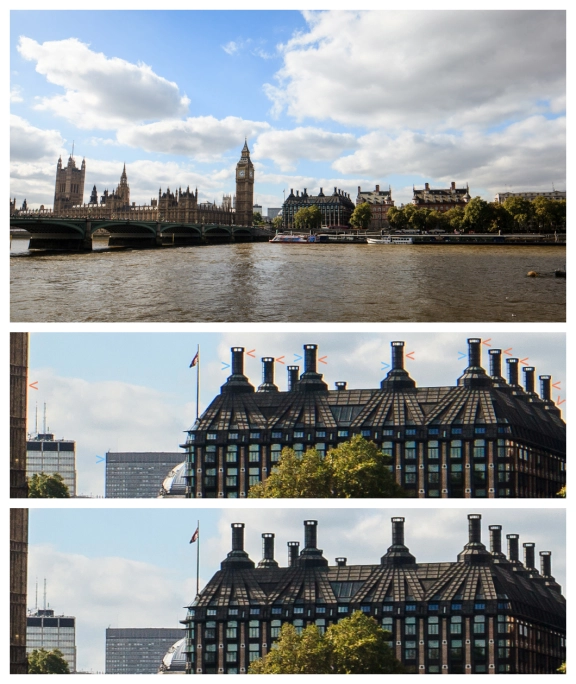
Figure 14 | Demonstration of chromatic aberrations observed with the Canon 24mm f/3.5L TS-E II. Blue/orange CAs (arrowheads) can sometimes be seen in high contrast areas when zooming into images (bottom left). This is generally unnoticeable at normal screen/print sizes and is easily fixed using the automatic tool in Lightroom or similar programs (bottom right). Sharpness is excellent, particularly after removal of CAs. Click for larger image.
Flare
My biggest issue with this lens is flare. Apparently it is controlled better than with the TS-E I, but it can still be pretty bad. Figure 15 shows examples where the sun is close to or in the frame. The first is unedited and shows how contrast is affected by flare. You can also see faint green/yellow octagons of flare around the first bridge arch. The second image is edited to bring back some contrast in the left-hand side, but a green blob of lens flare is still obvious, ugly and slightly distracting. The final image shows the worst case scenario, where large and obvious flare with loss of contrast remains after editing. With the sun in the frame, this is to be expect to some extent.
On some occasions I like flare, as in the last image, and its good to be able to get some for artistic reasons, when wanted. However, I have notice that this lens sometimes flares even when the sun is quite a way out of the frame, and it is definitely something to consider when shooting. I haven’t tested whether the use of a circular polarizer makes this lens more prone to flare, I don’t think it does. Since I have heard Canon recommend extra shading in addition to the lens hood (though I can’t remember where I heard this), flare control should probably not be considered a strong point of this lens.
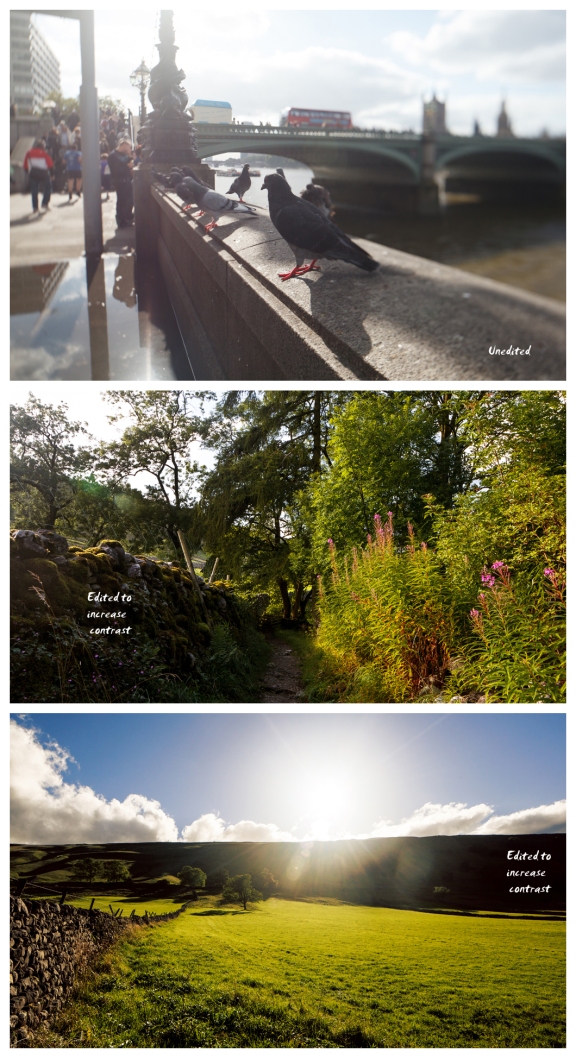
Figure 15 | This lens has flare. I have found the Canon 24mm f/3.5L TS-E II to be prone to flare. This is not always a problem, and can even be desired. The images provide examples of flare characteristics and how editing can rescue some contrast, but not all signs of flare.
Conclusions
If you are considering a high quality 24mm lens, particularly if you are into architectural and landscape photography, them you should definitely consider the Canon 24mm f/3.5L TS-E II. It really does deliver superb results, and the tilt and shift functions will give your images something that no other lens can. If your main interests lie outside these photographic disciplines, other lens covering 24mm that has the ability to autofocus and zoom, or which are faster might represent more sensible options.
The Canon 24mm f/3.5L TS-E is not perfect, but it is an improvement of the mark I version, and I have found it to perform really well. In fact, I have grown to love it. It is not my most used lens, but I use it more than I thought I would. I would use it more if I could get around more and fulfill my desire to develop my landscape photography. Generally though, I use it for specific purposes, as it is not the most versatile lens. It is my go to lens for landscapes, since it represents a suitable focal length, takes filters and produces stella image quality. However, I do occasionally take it out for a walk around town or the countryside and alway get shots that I like, whether they are near-macros, miniature fakes, full body portraits, or arty shots that take advantage of the tilt mechanism. It is just a solid performer and a fun lens that inspires creativity.
Here is a short list of pros and cons.
Pros:
- Sharp, Sharp, Sharp
- Good contrast
- Low vignetting
- Short MFD
- Takes filters (though 82mm filters are pricey)
- Ability to correct perspective and create panoramas using shift
- Ability to maximize use of DoF and angle the plane of focus
- Low chromatic aberration
- No distortion
- Relatively fast
- Well built
- Great focus ring
- Makes you think and inspires creativity
- Fun
Cons:
- Manual focus only
- Fiddly, complicated and slow to use
- Requires a tripod to get best results
- Prone to flare
- Some chromatic aberration
- Vignetting and loss of sharpness when shifted (not a huge issue)
- Exposure errors when lens barrel is tilted/shifted
- Pricey!
- Poor protection from the elements
Thank you for reading my description and impressions of this lens. I hope you have found it informative and have enjoyed the pictures I have shown. If you are considering getting this lens and have any further questions, send me a comment and I will do my best to respond. Otherwise, I can only recommend it. It is a fantastic lens.
For more example images taken with this amazing lens, check out my flickr set devoted to it.
If you have any other feedback on this post, I would love to hear it. This is my first and I want to do them regularly, so your opinions and suggestions would help. If you have any ideas for topics or know of equipment I have that you would like my opinion on, let me know. You can also follow me of twitter and check out my flickr.
In the meantime, I will be sharing pictures from a trip to the Yorkshire Dales soon, so stay tuned.
Finally, thanks again for reading!



You’ve put a lot of time and effort into this. Very informative and well written. Great article!
Tori
Thanks Tori, I am glad you think so!
Very shortly this website will be famous among all blogging users, due to it’s fastidious articles
Thanks a lot for all these detailed infos, David!
Have the old version of this lens and found it’s worth to do an upgrade.
Jürgen
So helpful and informative, I have endlessly trawled so many Internet pages for information on this lens and this article is the best. Thank you!
Thanks for this. I am like you a non pro, and found this article very useful.
I really like this article. It answered all the questions I had about this lens. Thank you very much!
May I ask which font you used to label the images?
Hi, just read your great article about the 24mm TS/E lens. Brilliant, is what I say!! Seriously though, I’m doing a lot of product shots on location at the client’s home – shooting crockery, table tops, cushions and the like, with some lifestyle room shots too. But I do find I’m getting converging lines and distortion especially on wider shots. I’m thinking of getting a TS lens, and would like to hear your thoughts. Would a TS lens help? Cheers, Ben
Great article – thank you. One quick question – you mentioned that you use the “Hitech drop-in filter system from Formatt”. I have the same system, but could not get the Formatt-Hitech 82mm wide angle adaptor on to my 24mm TS lens. How did you do this or what adaptor are you using?
Hi Peter,
I am glad you like the article. I actually sold this lens and the filters a while ago, as I am downsizing my photography equipment. I don’t remember exactly how I connected the filter system to the lens, but as far as I remember I used an adapter ring from the same company, designed for the system, which screwed into the filter thread and then slotted into the aperture on the filter holder and was clamped on with screw. That is if I remember correctly. I think the adapter was something like this: http://www.formatt-hitech.com/hardware/rotating-adaptor-rings-for-firecrest-100mm-holder
Hope that helps!
Thanks again,
David
A great review. Very comprehensive.
…nice photos too.